When you develop an app, routing navigation is one of the most travail questions that many new developers search for. Not only routing in the app has to be simple and understandable, but also scalable. In this article, you will learn how to create simple and scalable named route navigation using the Flutter framework and GetX package.
Set up a project structure for routing
The very first step that all new developers should do when they implement routing in their app is to create the right project structure. This will allow us to simplify many extra coding and also make it scalable.
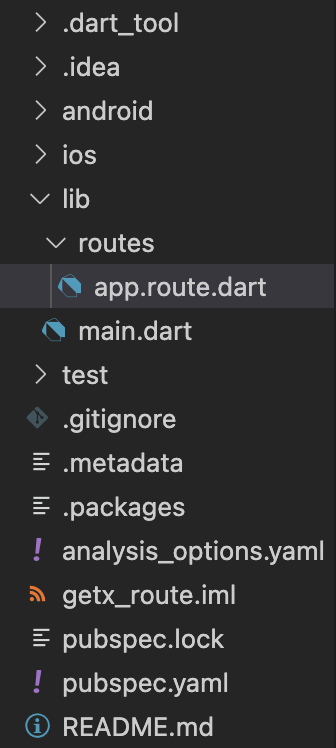
Assuming we are starting a project from scratch, and we already imported a get package and added it to pubspec.yaml. Then in the lib folder, create folder routes, and inside it, create a file named app.route.dart.
The result should look like this:

Implement simple and scalable route navigation
Now, when we create a project structure, we can implement a simple and scalable routing.
The method that we are going to use is probably will be unfamiliar to you. We are going to create enumerate type for our named routing. This will allow us to have a clean and scalable and more understandable code since if you are working with other developers, it will be very easy to understand which named route exists and which one you should use.
In the app.route.dart file, import get package and create enum RouteView with names of the pages. In our case, it will be home, auth, and unknown
import 'package:get/get.dart';

enum RouteView { home, auth, unknown }
Greate, the next step is we are going to implement an extension for our enumerate RouteView this extension will extend the ability of our RouteView enumerator and we will handle navigation transition there. For example, without an extension in general the only thing we can do with it is just call RouteView.home and if we need .name to convert it to string, but this is useless in our case. Would not be nice to extend with some kind of go() function so that we could type RouteView.home.go() and it will go to the home page? I think so! Then, let’s make it work.
To do so, we simply write the extension ActionRouteView on RouteView, and inside this, we create our Future go() function.
import 'package:get/get.dart';

enum RouteView { home, auth, unknown }

extension ActionRouteView on RouteView {

  Future<void> go() async {}

}
Now, if you type RouteView.home you will see that the go() method appears in the selection of options. However, our go() method does not do anything yet. So. let’s create a logic.
Get package has many options to navigate to different pages, for example, Get.toNamed, Get.offNamed, etc. However, for simplicity, we are going to use there of them.
- Get.offAllNamed() – If this one is used, then you will be redirected to a named page, but all other routes will be removed from the stack, this means that you will not able to navigate back to any of the pages. For example, it will be useful to use if you have an authentication page, and after you successfully authorized, you do not want to navigate back to any of the previous pages.
- Get.offNamed() – if this one is used, then you will navigate to the next named page, but the previous one will be removed from the stack. You can use it when you have some two screens configuration, and when it’s done, and you press pop from the screen, you will be back one screen before it.
- Get.toNamed() – if this one is used, then you will be redirected to the named route with the ability to come back to the previous page and no other routes will be removed from the stack.
So, to implement all these three methods, we will use boolean inside our go() function.
import 'package:get/get.dart';

enum RouteView { home, auth, unknown }

extension ActionRouteView on RouteView {

    Future<void> go({bool replacment = false, bool clearAll = false}) async {
    if (clearAll) {
      return Get.offAllNamed(name, predicate: (route) => false);
    } else if (replacment) {
      return Get.offNamed(name);
    } else {
      return Get.toNamed(name);
    }
  }

}
Awesome, now we are done with app.route.dart file. The next step is we need to let our app knows which Page or Screen does RouteView.home.go() function should go to.
To do so, we need to go to the main.dart file, and implement getPages
In the main.dart file, instead of MaterialApp, set GetMaterialApp (and make sure to import get package). Then, add the new parameter getPages.
getPages is a type List<GetPage<dynamic>>? but if we use RouteView.values – it will be a List<RouteView> which will not fit this type. So, to fix it, we will use a magic map() with Switch Statment that will convert out List<RouteView> to List<GetPage<dynamic>>
import 'package:chat_app/routes/app.route.dart';
import 'package:flutter/material.dart';
import 'package:get/get.dart';

void main() {
  runApp(const MyApp());
}

class MyApp extends StatelessWidget {
  const MyApp({Key? key}) : super(key: key);

  @override
  Widget build(BuildContext context) {
    return GetMaterialApp(
      title: 'Flutter Demo',
      theme: ThemeData(
        primarySwatch: Colors.blue,
      ),
      getPages: RouteView.values.map((e) {
        switch (e) {
          case RouteView.home:
            return GetPage(name: "/${e.name}", page: () => YourHomePageView());
          case RouteView.auth:
            return GetPage(name: "/${e.name}", page: () => YourAuthPageView());
          default:
            return GetPage(name: "/${e.name}", page: () => UnknownView());
        }
      }).toList(),
      initialRoute: RouteView.home.name,
    );
  }
}
Note: We did not implement the case RouteView.unknown: because it will be duplicated with the case default: and thus, we do not need any extra code.
if you take a closer look above, we also set initialRoute: RouteView.home.name which means that our initial route will be home.
Finally, we can now use e.g RouteView.home.go() on the press button, and we will be moved to YourHomePageView()
Note: YourHomePageView() we did not implement in this article, but it can be any of your pages e.g stateless, stateful, or GetView.
That is pretty much it, I hope this article was useful!


