While developing an app using the Flutter framework, you might as yourself a question: How to pick an image from a phone gallery and then crop it. In this tutorial, we are going to use two main packages: image_picker, and image_cropper. In addition, we also going to create the right project structure, so we have a clean and reusable code.
Before we begin, make sure that you are running flutter with a null safety by checking an SDK version in pubspec.yaml
environment:
  sdk: ">=2.12.0 <3.0.0"
Alright, without further ado, let’s begin
Table of Contents
1. Create Organized Project Structure (optional)
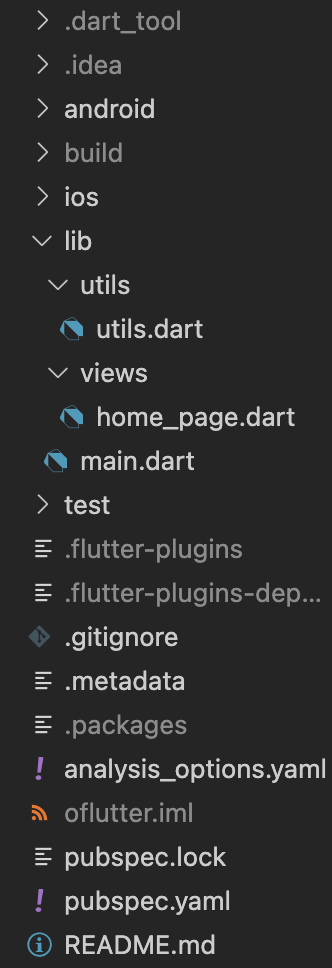
Before we do any coding, it’s always best to create an organized project structure so that we have clean and reusable code. To do so, just simply create two files inside the lib folder: Views and Utils.
- Views folder – will contain all pages in our app. For this tutorial, we will just have a home_page.dart
- Utils folder – will contain our utils.dart file where we will create reusable image picker and crop functions
The final result should looks like that:
2. Import image_picker and image_cropper Packages
Second step – we need to import image_picker and image_cropper from pub.dev in our project. Then we need to place them in pubspec.yaml under dependencies:
dependencies:
  flutter:
    sdk: flutter

  image_picker: ^0.8.4
  image_cropper: ^1.4.1
Note: As a time your read this blog post, the version of image_picker and image_cropper might be changed. So, make sure you used a link provided earlier in this step to have up to date package version
After you imported these packages, make sure you completely restarted the application (close and run again). Otherwise, you might get an error.
3. Create Image picker and Image cropper function
In this step, we will create two functions: pickImageFromGallery() and cropSelectedImage()
- Future<XFile?> pickImageFromGallery() – This function will be async and will be responsible for open a gallery and select an image. As of completion, the function will return an X-File from which we can retrieve a temp path of a selected image.
- Future<File?> cropSelectedImage(String filePath) – This function will be async and will be responsible for copping earlier selected image. As of completion, the function will return a File from which we can either get the path, convert to base64 or convert to Uint8List.
All these files will be created in utils.dart file inside Utils class. The final code should look like that:
import 'dart:io';

import 'package:image_cropper/image_cropper.dart';
import 'package:image_picker/image_picker.dart';

class Utils {
  Utils._();

  /// Open image gallery and pick an image
  static Future<XFile?> pickImageFromGallery() async {
    return await ImagePicker().pickImage(source: ImageSource.gallery);
  }

  /// Pick Image From Gallery and return a File
  static Future<File?> cropSelectedImage(String filePath) async {
    return await ImageCropper.cropImage(
      sourcePath: filePath,
      aspectRatio: const CropAspectRatio(ratioX: 1.0, ratioY: 1.0),
      iosUiSettings: const IOSUiSettings(
        title: 'Crop Image',
        aspectRatioLockEnabled: true,
        minimumAspectRatio: 1.0,
        aspectRatioPickerButtonHidden: true,
      ),
    );
  }
}
Now, anywhere we need to pick an image and/or crop it. We can call these two functions.
4. Pick and Crop an Image
The final step is we are going to create a simple home page screen inside home_page.dart and test our functionality.
Go to home_page.dart file, and paste the code provided below:
import 'dart:io';

import 'package:flutter/material.dart';
import 'package:oflutter/utils/utils.dart';

class HomePage extends StatefulWidget {
  const HomePage({Key? key}) : super(key: key);

  @override
  _HomePageState createState() => _HomePageState();
}

class _HomePageState extends State<HomePage> {
  File? image;

  @override
  Widget build(BuildContext context) {
    return Scaffold(
      body: SafeArea(
        child: Center(
          child: Column(
            mainAxisAlignment: MainAxisAlignment.center,
            children: [
              if (image != null) ...[
                Container(
                  height: 100,
                  width: 100,
                  margin: const EdgeInsets.only(bottom: 15),
                  decoration: BoxDecoration(
                    image: DecorationImage(
                      image: FileImage(image!),
                    ),
                    boxShadow: const [
                      BoxShadow(
                        offset: Offset(0, 4),
                        blurRadius: 10,
                        spreadRadius: -5,
                      )
                    ],
                    borderRadius: BorderRadius.circular(10),
                  ),
                ),
              ],
              TextButton(
                onPressed: () async {
                  // Step #1: Pick Image From Galler.
                  await Utils.pickImageFromGallery().then((pickedFile) async {
                    // Step #2: Check if we actually picked an image. Otherwise -> stop;
                    if (pickedFile == null) return;

                    // Step #3: Crop earlier selected image
                    await Utils.cropSelectedImage(pickedFile.path)
                        .then((croppedFile) {
                      // Step #4: Check if we actually cropped an image. Otherwise -> stop;
                      if (croppedFile == null) return;

                      // Step #5: Display image on screen
                      setState(() {
                        image = croppedFile;
                      });
                    });
                  });
                },
                child: const Text('Select image'),
              ),
            ],
          ),
        ),
      ),
    );
  }
}
And inside main.dart file, place the code provided below:
import 'package:flutter/material.dart';
import 'package:oflutter/views/home_page.dart';

void main() {
  runApp(const MyApp());
}

class MyApp extends StatelessWidget {
  const MyApp({Key? key}) : super(key: key);

  // This widget is the root of your application.
  @override
  Widget build(BuildContext context) {
    return MaterialApp(
      title: 'Flutter Demo',
      theme: ThemeData(
        primarySwatch: Colors.blue,
      ),
      home: const HomePage(),
    );
  }
}
Well, that’s pretty much it. Now, if you click on “select image” you would be prompted to select an image and then crop it. When you finish, you will see the selected image on the screen.